All this talk of RapCAD hasn’t gone un-noticed by the OpenSCAD maintainer(s). Recently on the OpenSCAD mailing list Marius Kintel has stepped forward and stated that he is now the core maintainer of OpenSCAD. He has also outlined his goals which are similar in essence to my own. Opening up development and try to build a better developer community, as well as hosting better forums/mailing lists bugtrackers and source code management. Based on this and other feedback, I have decided to change my approach somewhat. It doesn’t make all that much sense to duplicate the work of a project that is being actively developed and Marius has agreed that an OpenSCAD evaluation library could benefit multiple projects currently under development. So I will be offering any contributions I can that help OpenSCAD take this direction, and focus on developing RapCAD as a front-end thin wrapper application around this library.
Month: October 2010
CloudsCAD synergy
Another motivation for writing RapCAD is to provide a complimentary back end tool for CloudsCAD. As I understand, a number of features have been requested by Tony Buser and the CloudsCAD community and which the OpenSCAD community has been unable to address. I am hoping to build a stronger community by setting up rapcad.org and hosting state of the art bugtracking and source code management tools.
Announcing RapCAD
RapCAD is a new script based CAD IDE especially for RepRap printers. Read more over at rapcad.org

Announcing RapCAD
RapCAD is a new script based CAD IDE especially for RepRap printers. It will be a written from scratch based mostly on OpenSCAD and hopefully scad scripts will just work inside RapCAD. Ultimately however I would like to add new features to the script language, so that RapCAD files will be a superset of scad files. The IDE will contain project management tools, to allow more than one script to be grouped into a project. Another planned feature is a fully syntax hi-lighted script editor, as well as a 3D visualisation window reminiscent of OpenSCAD. The IDE will also contain gcode visualisation and generation tools as can be found in the esteemed Repsnapper. I am hoping to reap the benefits of combining these two applications into one and allow them to share code, for example slice and dice might be performed using CGAL. But more generally my motivation for doing this is because I would like a one stop app that can be both the design tool, and printing tool without having to go through the intermediary step of having to convert to and from STL. Support for importing from existing STL files will still be available facilitated by an import_stl() function in the script or by some other means.
What to do when you get bored…
When I get bored of waiting for someone else to do something I sometimes end up having a go at doing it myself. The hobbed insert in my previous post is no exception


Below is my setup using a drill stand. The 12mm round brass bar is held using a U-Shaped wooden clamp that mounts some 6901ZZ bearings, with an ID of 12mm and an OD of 24mm. I created some dimples on the 12mm brass bar with a punch to create an interference fit in the bearings. This stops things sliding around whilst doing the hobbing. One advantage of the drill stand (which is normally a disadvantage) is that it can swivel around the support pillar. So I was able to push the M3.5 tap closer and closer to the brass bar by pulling the handle to clockwise.

The next problem is how to drill a hole perfectly central down the middle for an m4 tap, again without a lathe. In the meantime the Conrad M4 Inserts have arrived in the worlds most ridiculously over sized box:

Server Migration
I have just completed a successful migration of gilesbathgate.com to a new server. Some headaches were importing the mysql data via the commandline (I gave up in the end and used phpMyAdmin) also lighttpd rewrite rules triped me up, and I forgot to install php5-gd for my wavatars support. But appart from that the migration was seemless, I am sure no one even noticed.
RapCAD.org
Registered the domain rapcad.org
Progress
I will keep this short and sweet since most of you (in the reprap community) have probably already seen posts like this time and time again. So basically here is a few snapshots of my build progress


Everything went together fairly easily, there were a few minor errors in the assembly instructions which I corrected. The only trouble I had was with Adrian’s geared extruder driver. The base has countersunk holes to fit the heads of M4 bolts, however they were not big enough and reaming them out to 7mm I almost drilled right through. I also felt that the extruder design in general was a bit “bitty” and so I am re-designing the thing from scratch. Here is a sneak peek

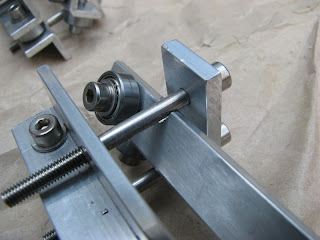
The following view shows the lower half of my redesign of the axle mount, it fully encapsulates the bearing rather than having them floating free. (The image shows two separate parts which would be bolted together)

I am intending to also use my internal teeth gear concept with this design

I also designed a hobbed m4 insert

The hobbed insert will soon be available to buy courtesy of raysu in his ebay shop. Price is currently TBC, but he offers similar items at around $8.50
The strangest gift my fiancée gave me.
For my birthday this year Joey has bought me…

…yes its all the parts needed to build my own Mendel 3D printer! I am really excited about putting them together thanks Joey for such a great gift, how did you know?
Shortly after receiving my gift I dismantled OverlapStrap. I was supprised that the sum of the assembled parts seemed so much more than the 22 bits of MDF 25 bits of aluminium angle and the box full of fixit blocks.

OverlapStrap was by necessity a much simpler design than Mendel. So maybe there is something to be learned from this, although I think designs like the one Josef Prusa has designed and built are even simpler still!
Giving up to make progress?
So, the bad news is that I have given up trying to print out all of the Mendel parts using OverlapStrap 😦 However the good news is that I now have a full set of Mendel RP Parts that materialized themselves sometime on Nophead‘s 3D printer(s) and which was then bought from him via his ebay shop. It seems a shame that I didn’t ever fully manage to bootstrap Mendel using my own repstrap, but at the end of the day it was never really my goal. I really started out on this journey because at the time no one seemed to be selling Mendel parts, and of course this is increasingly becoming untrue. I think I have learned a lot putting OverlapStrap together and proved to myself that given enough time, I could have printed out the missing parts and upgraded the machine bit by bit until it had become a Mendel. I believe I have also inspired at least one or two people to create designs that use elements of OverlapStrap, so I think will continue to document and develop OverlapStrap but it is likely only to be driven by other people taking an interest in the design. I never managed to get it running on belts, but I did have designs for how the belt driven “upgrade” would work. For example here are the Y-axis belt idler and motor mounting blocks.

And here is a photo of the x-axis fixit blocks which would have attached to the x-axis motor mounting plate.

